/
Quick Start Google Apps for Crowd
Quick Start Google Apps for Crowd
- Paweł Darmofalski (Unlicensed)
- Former user (Deleted)
Owned by Paweł Darmofalski (Unlicensed)
Last updated: 2016-12-19 by Former user (Deleted)
Configuration of the add-on
- First make sure you have correctly installed the add-on.
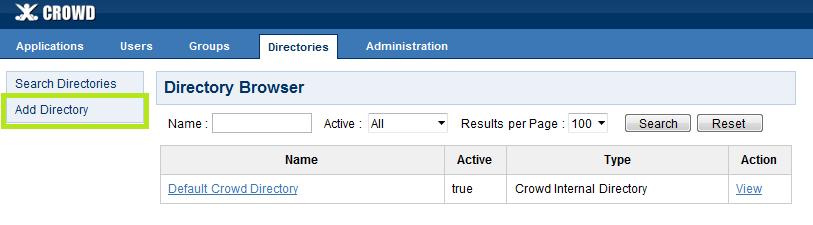
- Open Crowd Administration Console in your web browser.
- Click the Directories link in the top navigation bar.
- Click Add Directory.
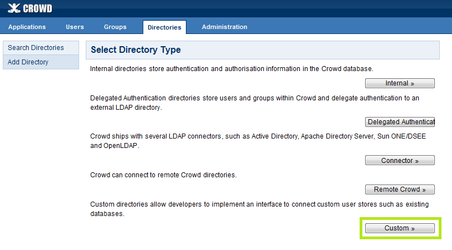
- Click Custom.
- In Name field give your directory a name. In Implementation Class input you have to put fully qualified class name of custom directory. The add-on provides two types of the directory:
pl.craftware.crowd.directory.GoogleAppsDirectory- directory that disallows local Crowd groups to be used with Google users;pl.craftware.crowd.directory.GoogleAppsWithLocalGroupsDirectory- directory that doesn't have this limitation.
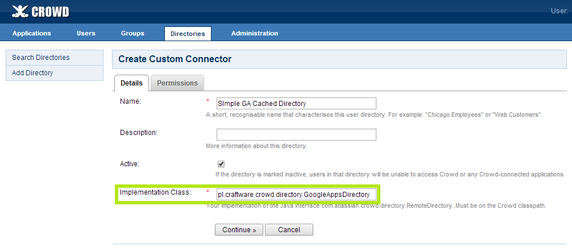
Type one of them and click Continue. - Create a Google user that will be used by the add-on to integrate with Google Apps, and give that user read-only access to your domain information.
Because the plugin runs on your Crowd server, you have to generate your own Google API key:
- create a project in Google Developers console;
- activate Admin SDK API;
- create a Public API access API key.
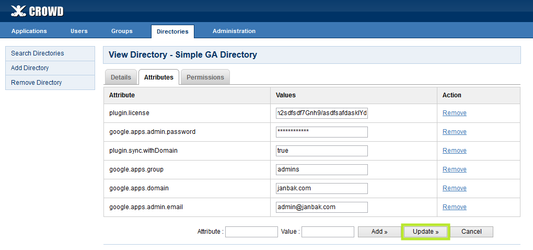
Go back to Crowd Administration Console, and click Attributes tab. You have to provide the following attributes:
plugin.license- license for add-on;google.apps.domain- name of your Google Apps domain (likeexample.com);google.apps.admin.email- the e-mail of the Google user created above;google.apps.admin.password- password for that user;google.api.key- the API key created above;google.apps.group(optional) - Name of Google group, used to filter users. If provided then only users from that group will be shown in the directory. If blank, then all users will be displayed.plugin.sync.withDomain(optional) - Determines whether domain name will be appended to directory user and group names. If set totrue, domain name will be appended (e.g.admin@example.com), iffalseor empty, it won't be (e.g.admin).google.apps.batchRequestReadTimeout(optional) - Timeout in milliseconds for requests to google for fetching users and groups. Default value if not provided is 5 minutes = 300000 miliseconds.
- Click Update.
(optional) Maybe you need to configure something more in this directory.
It may take some time to load data from Google domain. If you don't see any users or groups in that directory for long time, check logs.
- (optional) Configure JIRA and other apps to use this directory.
Upgrading from 0.7.x to 1.x
Because the new version uses the new Google Admin SDK API, you have to do a few extra steps to upgrade to the new version:
- Do step 1 described above (replace the old JAR with the new one);
- Do step 8 described above (generate Google API key);
- Do step 9-12 described above (enter the key, and check whether the directory works).
- Change logging level for google api as desribed in Konwn problems section
Logging
Crowd logging can be changed as desribed here
All logs from this add-on and libraries it uses reside in the file
All logs from this add-on and libraries it uses reside in the file
atlassian-crowd.log. By default INFO log level is enabled, sometimes when there's a problem with the plugin it's too little to find the reason and you have to to increase log level of some logger, or when some logger produces too much data, you have to decrease its log level. The most interesting loggers are:pl.craftware.cpga4c- logs from the add-on;pl.craftware.shaded.com.google.api.client.http.HttpTransport- HTTP requests issued to Google servers;pl.craftware.shaded.com.google- logs from Google libraries the plugin uses;pl.craftware.shaded.org.perf4j.TimingLogger- HTTP requests which are too slow;pl.craftware.shaded- logs from libraries the plugin uses;pl.craftware- logs from the add-on and libraries it uses;
The configuration happens in
log4j.properties file. For example, to disable logging of slow HTTP requests, add the following line to log4j.properties:log4j.logger.pl.craftware.shaded.org.perf4j.TimingLogger=OFFFor the exact locations of atlassian-crowd.log or log4j.properties, and for more details on logging in Crowd, see here in Crowd documentation.
, multiple selections available,