Administrator's Guide Google Apps For Crowd
Introduction
Google Apps for Crowd is a plugin for Atlassian Crowd, which makes it possible to reuse your user database from Google Apps domain in any application which can connect to Atlassian Crowd user database.
Internally, versions before 1.0 used Provisioning API to get user and group list and ClientLogin to get access token to Provisioning API and validate user passwords. Since Google has deprecated that APIs, in version 1.0 we moved from Provisioning API to Directory API to get user and group list, and in version 1.1 we moved from ClientLogin to GMail's IMAP to validate user passwords, and to service accounts to get access token to Directory API.
Because of introduction of the service accounts, unfortunately the administrator of your Crowd server needs to do some extra configuration during upgrade to 1.1 version; but thanks to this the authentication process to Google APIs is safer: you don't have to give real password to Google Apps domain to get user and group list, just a 'per-application' password (JSON key) for this service account is enough. From end user perspective nothing changes - they can still login using their Google Apps login and password as they did before.
Just like 'per-application passwords' for service accounts, the plugin also supports Google 'per-application' passwords for end-users to improve security. More information on that is provided here.
Google Apps domain configuration
Service account for Directory API
The plugin needs to use Google Directory API; one thing required to access it is a service account with proper access rights:
- In Google Developers Console:
- Create a Google Developers Console project (you can give it any name);
- Activate Admin SDK API;
- Generate your own Google Service Account, In your developer console go to Api Manager -> Credentials -> Manage service accounts -> Create service account -> enter the name and check Enable Google Apps Domain-wide Delegation -> Create after that please go to your developer console -> Api Manager -> Credentials In OAuth 2.0 client IDs section you should have recently added service account then next go to Create credentials -> Service account key -> check JSON and choose from list last added Service account -> Create after that, download it Copy and save field with name Client Id. Client Id will be used to add access rights to this service account;
- In Google Apps Administration Console:
- Enable API access to your domain: Security > API Reference > Enable API access (enabled by default);
- Add access rights to the service account:
- Go to Security > Show More > Advanced settings > Manage API client access;
- In the Client Name field paste value Client Id of the service account created in developers console;
- In the
- Click Authorize.
Administrator e-mail
IMAP for authorization of users
- In Google Apps Administration Console check if GMail is enabled: Apps > Google Apps > GMail(enabled by default);
- Every user needs to enable IMAP on their GMail account: GMail > Settings > Forwarding and POP/IMAP > Enable IMAP (enabled by default);
- Enable IMAPS port (
993) on your firewalls so that the plugin on your Crowd server can check user passwords (probably enabled by default by your administrators). (optional) If you're unsure if this port is open correctly, just try this shell command on that machine:
nc -z imap.gmail.com 993
or:
echo "" | telnet imap.gmail.com 993
(immediate exit from this command with no error means that the port is open, long waiting for connection and/or error like "Unable to connect" or "Connection timeout" means that port isn't open).
Allow less secure apps: ON
To allow IMAP authethication with password, account in google domain must have "Allow less secure apps" enabled.
2-step verification (optional)
To improve security, the plugin partially supports 2-step verification for end users: things like SMS codes won't work with applications that use Crowd for authentication, because those applications display their own login window instead of using the one provided by Google. However instead of that, your end users can use per-application passwords. To use them each user should follow these steps:
- Enable 2-step verification (if not enabled yet);
- Add one or more per-application passwords:
- In Select application field choose Custom;
- Give it any name (like
Crowd,JIRA,JIRA on my work laptopor whatever - Google doesn't verify this name in any way, it's just for your information);
- Use the generated per-application password to login to that application. Because the password is machine-generated, usually it's best to use options like Remember me or Save password in the application and the web browser;
When you suspect an unauthorized access to an application using one or more of your application passwords (for example when your laptop was stolen), go again to the application passwords page (Google may ask you for SMS codes for better security), Cancel those passwords and generate and use new ones. It can also be a good idea to always regenerate the passwords from time to time.
Crowd directory configuration
- Open Crowd Administration Console in your web browser in new tab (to be able to return to Google Apps domain settings easily if they're wrong);
- Click the Directories link in the top navigation bar;
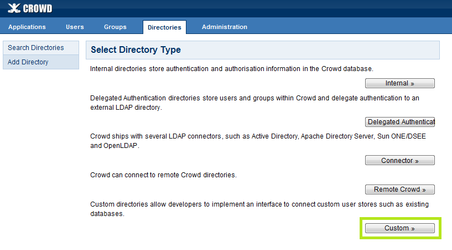
- Click Add Directory.
- Click Custom.
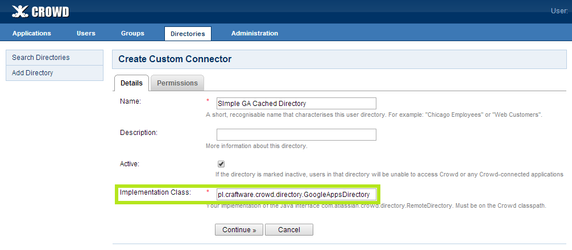
- In Name field give your directory a name.
- In Implementation Class input you have to put fully qualified class name of custom directory. The add-on provides two types of the directory:
pl.craftware.crowd.directory.GoogleAppsDirectory- directory that disallows local Crowd groups to be used with Google users;pl.craftware.crowd.directory.GoogleAppsWithLocalGroupsDirectory- directory that doesn't have this limitation.
- Type one of them and click Continue.
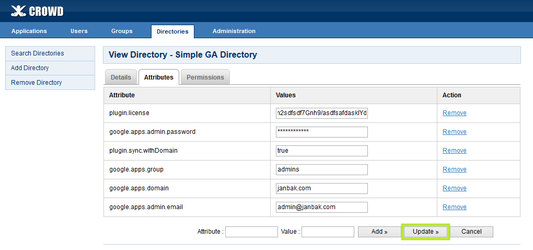
Click Attributes tab. You have to provide the following attributes:
| license for the plugin (you can get 30-day trial license for free) |
| name of your Google Apps domain (like |
| the e-mail of the user from Administrator e-mail step |
| contents of the JSON key file downloaded in Service account for Directory API step |
| unused keys from previous versions from this plugin, you may delete them; now the JSON key does the same in much more secure way |
| Name of Google group, used to filter users. If provided then only users from that group will be shown in the directory. If blank, then all users will be displayed |
| Determines whether domain name will be appended to user and group names returned by the directory. If set to |
| Timeout in milliseconds for Google batch requests (for fetching user and group details). Default value if not provided is 5 minutes = |
| Maximum size of Google batch requests. Tweaking this value may increase (or decrease) directory speed. Valid values are |
| CPGA4C directory is prefetched and cached from time to time (Crowd calls this process 'synchronization'). This value is specified in seconds - the default is |
| Remove this property (if exists) to apply your changes immediately during next directory action, without waiting for next directory.cache.synchronise.interval |
Click Update.
Open new web browser tab and inside it configure JIRA and/or other apps to use this directory.
- Go to the Authentication Test tab inside the application configuration web browser tab, and test whether users can login to the app with their passwords.
If there's something wrong, you'll get an appropriate error message in this window (in a real application login window it's typically hidden for security reasons). Then you can go back to the directory settings browser tab, or to the Google Apps domain configuration browser tab to fix what's wrong. If the error message on the screen doesn't say anything to you, check FAQ and logs.
If you change directory settings, you have to remember to remove
com.atlassian.crowd.directory.sync.laststartsynctimeand then rerun the authentication test to make sure the new settings are applied immediately.
Crowd logging configuration
Crowd logging can be changed as described here.
All logs from this add-on and libraries it uses reside in the file atlassian-crowd.log. By default INFO log level is enabled, sometimes when there's a problem with the plugin it's too little to find the reason and you have to to increase log level of some logger, or when some logger produces too much data, you have to decrease its log level. The most interesting loggers are:
pl.craftware.cpga4c- logs from the add-on;pl.craftware.shaded.com.google.api.client.http.HttpTransport- HTTP requests issued to Google servers;pl.craftware.shaded.com.google- logs from Google libraries the plugin uses;pl.craftware.shaded.org.perf4j.TimingLogger- HTTP requests which are too slow;pl.craftware.shaded- logs from libraries the plugin uses;pl.craftware- logs from the add-on and libraries it uses;
log4j.properties file. For example, to disable logging of slow HTTP requests, add the following line to log4j.properties:
log4j.logger.pl.craftware.shaded.org.perf4j.TimingLogger=OFF
atlassian-crowd.log or log4j.properties, and for more details on logging in Crowd, see here in Crowd documentation.


