- Log into your Administartion Administration Jira console.
Find Craftware Timeline section and click Configuration.
- You will see an add-on configuration screen, where you can setup set up start, end, and grouping field fields for timeline items, number of displayed issues, and using only working days in timeline calculations.
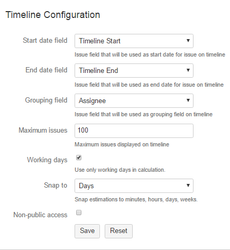
On this screen, you can set the start, end, and grouping fieldfields. You can choose from all fields, which have a date or datetime date-time format, and from standard JIRA fields and custom fields. You can also choose how many issues you want to see on your Timeline. You can choose that only working days will be used for calculation (Free days will be skipped, and marked on your Timeline), sanaping snapping and non-public plugin access.
Non-public access
| Info |
|---|
Available from 1.8.0 version |
By default, all JIRA users can use the Timeline plugin, but JIRA Administrator can configure that only selected users or groups will be able to use the Timeline plugin. Not selected users can;'t see the Plugin top bar menu, and they can't view view any timeline.